Monday, October 31, 2011

Caramel Apples

Happy Halloween Dearies!
An apple for you, my dear...no poison, I swear.

Trick or Treating time is almost here! Then the holidays will really sneak up on us! Thanksgiving and Christmas, my dear baby boy's birthday in the middle of it all. It makes my head spin to think about it!

I hope you all had a fun Halloween weekend.
(because we certainly did)

Every day we shufflin

 Our annual pumpkin carving party was last night, and it was loads of fun as always. Uncle Mike even made a death star pumpkin to go with Lucas' Darth Vader costume. It was awesome. And of course, there was lots of great food including these delicious caramel apples, courtesy of Annie's Eats, my favorite food blog.

I've always been a little wary of making my own caramel, but I am afraid no more. These caramel apples were so incredibly good that I'm sure I'll be making them for many occasions. I will go out of my way to find an excuse to makes these again. Caramel apples are, after all, one of my favorite treats. If you've been afraid of candy making in the past, I urge you to face that fear. These are worth it. Promise.

Caramel Apples
adapted from Annie's Eats

makes 10-12 small apples

8 tbsp. unsalted butter
2 cups packed brown sugar
1 cup light corn syrup
Pinch of salt
1 (14 oz.) can sweetened condensed milk
1 tsp. vanilla extract
10-12 small Granny Smith apples, stems removed
10-12 wooden dowels or lollipop sticks

Directions:

Melt the butter over medium heat in a medium, heavy-bottomed saucepan (This is very important, I used a saucepan without a heavy bottom and had to start all over again because the caramel burned almost instantly). Mix in the brown sugar, corn syrup and salt.  Cook the mixture, stirring occasionally, until it comes to a boil.  Stir in the condensed milk.  Cook and stir until a candy or instant-read thermometer reads 248° F (firm ball stage.)  Remove from the heat and stir in the vanilla.

Insert a lollipop stick or thin wooden dowel (or a trimmed skewer, if you're like me) into the bottom of each apple so that it is firmly in place.  Dip the apples one at a time into the caramel mixture, turning slowly to coat evenly.  Transfer to a baking sheet lined with wax paper and allow the caramel to set.  Decorate as desired, with melted chocolate, chopped nuts, or candy pieces. (I'm partial to the traditional myself)


Friday, October 28, 2011

Frightening Fingers

These spooky fingers are on my Halloween spread every year. They're so fun, festive and easy to make. Everyone always gets a kick out of the oozing blood. They taste great too. What's not to love?

Okay, I'll admit, my fingers have a little "more to love" than they should. I don't know why I never learn to make skinnier fingers. Every year I end up with chubby witch fingers and promise I'll remember not to make them so darn fat next year.

Well, there's always next year. . .

Frightening Fingers
adapted from Taste of Home Holidays & Celebrations Cookbook (2001)

makes 4-5 dozen

1 cup butter, softened
1 cup confectioners sugar
1 large egg
1 tsp. vanilla extract
1 tsp. almond extract
2 3/4 cups flour
1 tsp. baking powder
1 tsp. salt
raspberry or strawberry jam (preferably seedless)
1/4 cup sliced almonds

In a large bowl, beat butter and sugar until light and fluffy. Beat in egg and extract until well combined. In another bowl combine flour, baking powder and salt. Gradually add to creamed mixture. Refridgerate dough for 1 hour, or until easy to handle.

Form dough into skinny fingers using your hands. Using the flat end of a butter knife make an indentation in the top of each finger for the nail bed. Cut three slit in the middle of each finger for the knuckles. Place on lined baking sheets about 1 inch apart. Bake at 325 for 20-25 minutes, until edges are golden.

Remove to wire racks to cool for five minutes. Take 1/8 tsp. jam and spread into nail bed. Wedge an almond slice into the jam, allowing the excess to ooze over the edges. Cool completely.

Thursday, October 27, 2011

Kisses for my Hubby

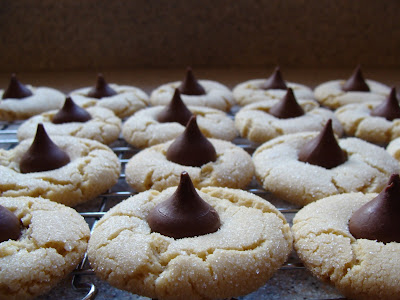
My husband is a bit of a dessert fanatic. If you asked him to pick a favorite I'm sure he'd bounce around ideas, finally saying he doesn't know. He has many favorites, but in my heart of hearts, I know that these Almond Kiss cookies are his true favorite. Every time we walk down the candy isle in Walmart, he looks longingly at the Hershey's Kisses and reminds me of "those cookies I used to make."

Maybe it's because they remind him of high school, when I used to bring these cookies to class with me. Maybe it's simply because they are truly delicious.Whatever his reason, I'm glad to have an excuse to make these cute little kiss cookies for him whenever the mood strikes me.

So eat your heart out hubby. You can have all the kisses I've got.

Almond Kiss Cookies
makes 40 cookies

1/2 cup butter, softened
1/2 cup sugar (plus more for rolling
1/2 cup packed brown sugar
1 large egg
1 tsp. almond extract
2 cups flour
1 tsp. baking soda
1/4 tsp. salt
40 milk chocolate kisses (with almonds, optional)

In a large bowl cream butter and sugars until fluffy. Beat in egg and extract until well combined. In another bowl, combine flour, baking soda and salt; gradually add to creamed mixture. Cover and chill for 1 hour or until easy to handle.

Roll dough into 1" balls, then roll in additional sugar. Place cookies 2" apart on an ungreased baking sheet. Bake at 325 for 13-15 minutes, until slightly golden and cracked.


Tuesday, October 25, 2011

Creepcakes!

Halloween is my second favorite holiday of all time. Christmas is first. Thanksgiving is third. But I love kicking things off with Halloween. My good friend Mandy and I always host a pumpkin carving party, and it just gets better every year.

A very attractive shot from the 2008 Pumpkin Carving Party


It is a great tradition. And, as with all great traditions, it comes with an array of special food. In preparation for this year's festivities I've started gathering ideas and trying out exciting new party foods.

Enter these fabulously fun creepcakes!
How fun are those laffy taffy tongues?


These are my trial run, and there were certainly some winners in the bunch (and some very sad looking losers). I'm a big fan of the cyclops with tentacles and the funky little dude with the green tongue. Next time I'm going to do some light green frosting in addition to the dark green and maybe even some orange tint.

I used a basic chocolate cupcake recipe and a fluffy vanilla frosting for these, but you could substitute any number of flavor combinations for them. There are some must have candy items for these but you can use your imagination and whatever happens to be in your halloween candy stash.

Some must haves:

  • Chocolate Chips (regular and miniature)
  • Marshmallows (regular and miniature)
  • Laffy Taffy
  • Round colored candy (M&Ms, Gobstoppers, etc.)
  • Licorice Lace

Your basic step-by-step:

  1. Make your cupcakes, allow to cool completely. (I used regular and mini muffin tins for variety)
  2. Make your frosting, tint with your choice of food coloring (definitely do some light and dark green)
  3.  To make marshmallow eyes: cut a small slit in the top of a marshmallow, insert chocolate chips or colored candy for pupils. Marshmallows can also be sliced in half and have candy placed in center.
  4. To make tongues: flatten out a single piece of laffy taffy using a rolling pin or your hands, leaving the ends rounded. Cut in half and run a knife down the center of each tongue to make an indentation. 
  5. To make tentacles: flatten out laffy taffy and cut into long triangular pieces. Press with your fingers to curve.

Stay tuned for more tricks and treats to come this week!

Couldn't resist adding a picture of my little pumpkin at the pumpkin patch


Monday, October 3, 2011

Tragedy in Blogging

So for those of you who like to check in on my little food blog, you may have noticed there isn't much going on around here lately. This is because something awful has happened: I have no camera.

There are so many wonderful things I have been whipping up and none of them have been documented. It is tragic really. But I promise, when I find my camera charger (or buy a new one) I will have many amazing dishes lined up for you.

Fall cooking is in full swing here, I'll really make an effort to get things up and running within the week. Promise.
Related Posts Plugin for WordPress, Blogger...