Friday, April 20, 2012

Paneer Makhani (Paneer Butter Masala)

As I've stated before, I really REALLY love Indian food. However, I often shy away from making it at home because many recipes use hard to find ingredients. Not to mention it often dirties quite a few dishes and involves more prep than I care to do. But when Costco had two 14 oz. packs of paneer (Indian cottage cheese) for sale, I couldn't resist. Dirty dishes be damned, I was making some Paneer Makhani.

For those of you who aren't familiar with the dish, it's cubes of cheese simmered in a tomato and cream based curry with a multitude of delicious spices. If you add golden raisins and cashews to the curry it becomes a royal dish called Shahi Paneer, but I'm not into raisins so I went with the standard.

I checked out a bunch of recipes and made my own recipe based on personal preference and what I had on hand. I was amazed at how much easier it was than the Chicken Tikka Masala that I sometimes make. Cubing the cheese and cutting the onion was all the prep I needed to do and in the end, I only ended up with one cutting board and one skillet to clean. Plus it tasted amazing!

This one is a keeper for sure. I hope you try it out soon.

Notes: Most recipes call for 1/4-1/2 tsp. of fenugreek. I didn't have it on hand, but I would highly suggest adding it if it's in your spice pantry.

If you find paneer in a package with slightly more or less than 14 oz., that's totally fine. I prefer to fry mine in the same skillet I use to make the gravy, but you can also soak the paneer in salted, boiling water for 15 minutes if you don't like the fried texture. 


Paneer Makhani (or Paneer Butter Masala)

1 Tbs. vegetable oil
14 oz. paneer, cut into cubes
3 Tbs. butter, divided
1 onion, chopped
1 ½ Tbs. garlic ginger paste
1 tsp salt
¼ tsp cloves
1 tsp. caraway seeds
½ tsp cardamom
¼ tsp cinnamon
¼ tsp. mace
1 tsp. cumin powder
1 tsp. garam masala
1 tsp paprika
½ tsp cayenne
2 bay leaves
1 can of crushed tomatos
½ c water
½ c cream
2 Tbs. chopped cilantro

Heat the vegetable oil in a large nonstick skillet over medium-high heat. Fry the paneer on all sides until golden brown. Set aside.

Wipe out the pan and heat 1 Tbs. butter over medium heat. Add the onion and cook until softened, about 5-7 minutes. Meanwhile, combine all the spices and bay leaves in a small bowl.

Add the garlic-ginger paste and spices to the skillet; cook until fragrant, about 30-60 seconds. Add crushed tomatoes and water, bring to a boil. Reduce heat to medium-low. Cover and simmer for fifteen minutes. Add paneer and remaining 2 Tbs. butter to the gravy, cover and continue to simmer for 15-20 minutes.

Remove bay leaves and discard. Stir in cream and cilantro until warm, about 1 minute. Serve with basmati rice and/or naan (Indian flatbread).  

Thursday, April 19, 2012

Lemon Poppy Seed Muffins

The Best Make-Ahead Recipe from Cooks Illustrated is yet to fail me. These muffins are no exception. They are delicious, filling and have a variety of flavor variations which I am VERY excited to try out. Lemon poppy seed has always been a favorite flavor combination of mine, so I think these will probably remain the winner for me.

Aside from tasting wonderful, they are phenomenal because these babies cook straight from the freezer! When I don't feel like cooking breakfast and doing dishes all morning, these are a godsend. I can roll out of bed, turn on the oven, put some frozen batter balls into muffin tins and, what do you know, you've got breakfast.

Amazing.

Lemon Poppy Seed Muffins
makes 18 muffins

3 cups flour
1 Tbs. baking powder
½ tsp. baking soda
½ tsp. salt
2 ½ Tbs. poppy seeds
1 ½ Tbs. grated lemon zest
10 Tbs. (1 ¼ sticks) butter, softened
1 cup sugar
2 large eggs
1 ½ cups plain whole milk yogurt

Line muffin tins with 18 paper liners, set aside.

Whisk together the flour, baking powder, baking soda, salt, poppy seeds and lemon zest (be careful that the zest does not clump when mixing), set aside.

Beat the butter and sugar together on medium-high speed until very pale and fluffy, about 2-3 minutes. Add the eggs, one at a time, beating well after each addition.

Reduce mixer speed to medium-low and add the flour mixture in three additions, alternating with the whole milk yogurt. Pour batter into prepared muffin tins.

If you don’t plan on baking right away, tightly wrap muffin tin with plastic wrap lightly sprayed with PAM. Refrigerate up to 24 hours or freeze for up to one month. (Once frozen the batter balls can be transferred to a plastic freezer bag for storage).

To bake preheat oven to 375°. Unwrap muffins and bake until golden brown, 25-30 minutes if refrigerated, 35-40 minutes if frozen.

Tuesday, April 17, 2012

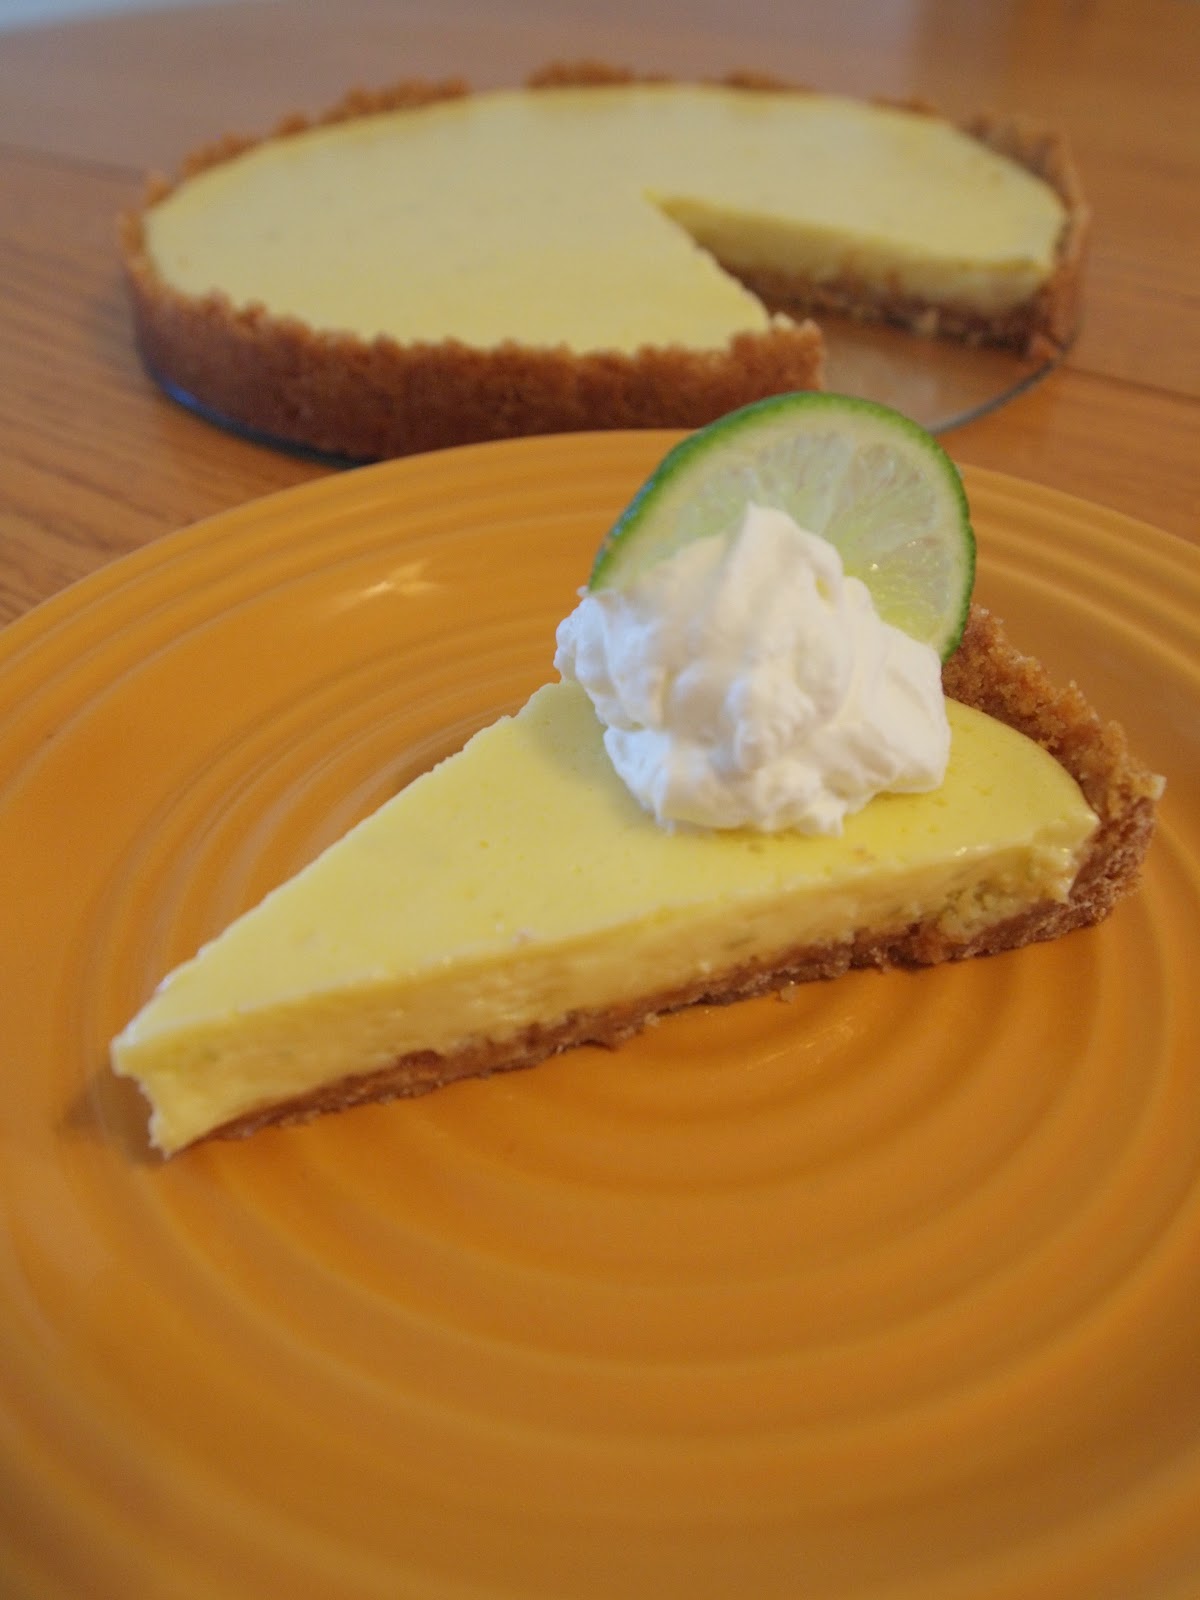
Key Lime Pie

Would you believe that I had never eaten Key Lime Pie until now?

It's true.

I was doing that "100 Foods to Eat Before You Die" food list challenge on Facebook (what can I say, I was bored for a brief moment) and came to the conclusion that I'm failing pretty miserably in my food adventures. Key Lime Pie was on that list, and it seemed unreal to me that I had not only never made a Key Lime Pie, but I had never even TASTED a key lime pie. The closest I'd ever come was eating those Key Lime Pie truffles they have at Sees Candies (which are delicious, in case you're wondering).

For all intents and purposes, I could not fathom why I had never tried making a Key Lime Pie. It seemed much like the recipe for Lemon Ice Box Pie in Sweet Serendipity, but with zesty sweet limes. Now that I've made it, I found it was even easier to make than Lemon Ice Box Pie, and so so very tasty.

Don't be like me. Don't waste your life away wondering about Key Lime Pie. Just make it, and love it.

Key Lime Pie
adapted from Cook Eat Love

For the Crust:
1 1/2 cups of finely crushed graham crackers
1/2 cup sugar
6 Tbs. butter, melted

For the Filling:
4 large egg yolks
1 Tbs. grated lime zest
1 can sweetened condensed milk
2/3 cup freshly squeezed lime juice

For the Topping:
1 cup heavy whipping cream
1/4 cup sugar
1 tsp. vanilla extract
 
 Preheat oven to 325.

Whisk together the graham cracker crumbs and sugar; add melted butter. Mix until there are no dry spots left. With your fingers (or using the back of a spoon) press the mixture evenly across the bottom and up the sides of a lightly greased 9" spring-form pan.  Bake for ten minutes, set aside.

In a stand mixture fitted with the whisk attachment, beat egg yolks and lime zest on high speed until very pale and fluffy, about 5-6 minutes. Gradually add condensed milk and continue to beat on high until very thick, about 3-4 minutes longer. Reduce speed to low and add lime juice just until combined. Pour into prepared crust.

Bake for 15 minutes, or until the filling is just set. Quickly run a knife around the edge to release the crust from the pan. Cool on a wire rack, then refrigerate overnight (or at least 3 hours).

For the topping, beat the whipping cream and sugar in a stand mixer fitted with the whisk attachment on high speed until stiff peaks form, about 3-5 minutes. Add vanilla and beat just until combined. Serve chilled alongside the pie.


Monday, February 13, 2012

Cake Decorating

 I've been playing with cakes and fondant over the weekend.

This one is very wedding-y and I have no use for it.
So I'm going to eat it.


This one is very Valentine-y, and therefore useful.
I will eat it tomorrow.

And I'll share the recipe for these 6" charmers, which you can decorate as you please.

But if you haven't tried fondant before, please do so.

It's like play-dough for bakers, and therefore AMAZING. 
Nom nom nom...

Monday, January 23, 2012

Oatmeal Butterscotch Cookies

Sorry for the long delay in posting. We've spent the past two weeks being incredibly sick and then recovering. Poor baby boy was throwing up for a week straight. Now the house is back in order, the mountains upon mountains of laundry are under control, and I am back with delicious cookies for you.

I've been chomping at the bit waiting to try out this particular recipe for weeks. Sometimes when I wait so long to try a recipe I am disappointed with the results because I've gotten my hopes up so high. Not so with these cookies. They are undeniably wonderful.

I love a good oatmeal cookie, but hate raisins. Deal with it. But these chunky wonders (filled with butterscotch chips, toffee bits and flaked coconut) fulfill my need for a hearty oatmeal cookie, sans raisin nastiness. It is well with my soul. And the hubs didn't mind them one bit.

Oatmeal Butterscotch Cookies
makes about 2 dozen cookies
 
¾ cup all-purpose flour
½ tsp. baking soda
½ tsp. ground cinnamon
¼ tsp. salt
8 tbsp. unsalted butter, at room temperature
½ cup brown sugar
¼ cup granulated sugar
1 large egg
½ tsp. vanilla extract
1½ cups old fashioned oats
¾ cup shredded coconut
½ cup butterscotch chips
¼ cup toffee bits

Preheat the oven to 350˚ F. Line baking sheets with silicone baking mats or parchment paper.

In a bowl, combine the flour, baking soda, cinnamon and salt.  Stir to blend, and set aside.  In the bowl of an electric mixer, combine the butter and sugars and beat on medium-high speed until light and smooth, about 2-3 minutes.  Beat in the egg until incorporated.  Blend in the vanilla.  With the mixer on low speed, mix in the dry ingredients just until incorporated.  With a spatula, fold in the oats, coconut, butterscotch chips and toffee bits until evenly combined.

Drop scoops of dough (about 2 tablespoons each) onto the prepared baking sheets, a few inches apart.  Bake for 12-15 minutes, until just set and light golden, rotating the pans halfway through baking.  Let cool on the pans about 5 minutes, then transfer to a wire rack to cool completely.

Monday, January 9, 2012

Banana Bread Bundt Cake


Is it cake? Is it banana bread? Do you honestly care?

I'd say this lands somewhere in the middle, but I'm going to call it banana bread so I feel less guilty about eating it for breakfast. It leans towards bread and is more cake-like in its shape. Are you convinced? I am.

I've been looking for a good banana bread recipe for a while. For something that has so many recipes out there, it's surprisingly hard to find a good one. They are either way too dense and often undercooked in the middle (or burnt on the outside if you want it fully cooked), or they are dry and crumbly and just all around gross.

This recipe from Ree Drummond (aka The Pioneer Woman) pulled through for me where many others have failed. It is moist but not undercooked, dense but not too dense. The crust is browned and crisp and wonderful. I will search for the perfect banana bread no more. It is here, and it is marvelous.

Banana Bread Bundt Cake
adapted from The Pioneer Woman

1 cup (2 sticks) butter
1 1/2 cup, plus 2 Tbs. sugar
3 eggs
1 tsp. vanilla extract
1 1/2 cups (about 3 medium) mashed ripe bananas
4 cups, plus 2 Tbs. flour
1 teaspoon baking soda
1-1/2 teaspoon baking powder
1/2 tsp salt
1-1/2 cup whole milk yogurt or sour cream

Preparation Instructions

Preheat oven to 350 degrees.

Grease and flour bundt pan.

Cream butter and sugar together until light and fluffy. Add eggs one at a time, beating until well combined after each addition. Mix in vanilla. Add mashed bananas and beat until combined.

Combine dry ingredients in a separate bowl. Add dry ingredients and yogurt alternately to the mixing bowl, beginning and ending with the dry ingredients. Beat well until combined.


Pour batter into bundt pan and bake for 1 hour or until a toothpick comes out clean.

Invert on a cooling rack and allow cake to cool slightly before slicing and serving with softened butter.

Saturday, January 7, 2012

Mushroom Gnocchi


I have a serious thing for mushrooms. I love stuffed mushrooms and mushrooms in salad and mushroom wine sauce over chicken and mushrooms risottos and grilled portabellas. I am yet to meet a mushroom that I do not love.

But until recently, cremini mushrooms had not entered my life. Now that they have, there is no going back. Who knew a mushroom could be so deliciously meaty? Who knew there was a mushroom out there more savory than a portabella? Well, now I know.

I can't get over how good this dish is. Seriously, people, this will change your life. Browning the gnocchi in butter after boiling them is a heaven-sent way to add flavor and complexity to your regular, bland store-bought gnocchi. The thick, creamy sauce with savory thyme is to die for. The mushrooms, I think you know how I feel about them.

This dish is so satisfying that it makes me think I could become a vegetarian again and eat mushrooms all day every day and never miss meat.

But then I remember how delicious bacon is. 

Mushroom Gnocchi
adapted from Cooks Illustrated Cooking for Two 2009

serves 2

1 1/2 cups (1/2 lb.) vacuum packed gnocchi
2 Tbs. butter
8 oz. cremini mushrooms, sliced
1 shallot, minced
1 garlic clove, minced
1/2 tsp. minced fresh thyme (or 1/8 tsp. dried)
1 tsp. flour
1 cup chicken broth
1/4 cup heavy cream
2 Tbs. white wine
1/2 cup frozen peas, thawed
salt and pepper
1 Tbs. minced fresh parsley

Bring 4 quarts of water to a boil in a large pot. Add 1 Tbs. salt and the gnocchi and cook until the gnocchi float to the surface and are just tender, about 2 minutes. Drain the gnocchi.

In a 10 inch nonstick skillet, heat 1 Tbs. butter over medium-high heat. Add the gnocchi and cook, stirring occasionally, until golden brown, about 5 minutes. Transfer gnocchi to a plate, set aside.

Heat remaining 1 Tbs. butter in the skillet over medium heat. Add mushrooms and shallot, cover, and cook until the creminis have released their liquid, about 4 minutes. Uncover and continue to cook until the creminis are well browned, about 5 to 7 minutes.

Stir in the garlic, thyme and flour, and cook until fragrant, about 30 seconds. Stir in the broth, cream and wine and simmer until the sauce has thickened slightly and reduced to about 1 cup, 12 to 15 minutes. Fold in the browned gnocchi and peas and cook until heated through, about 1 to 2 minutes. Season with salt and pepper to taste. Stir in parsley and serve.
Related Posts Plugin for WordPress, Blogger...